Way to Vacuum Pools
How to vacuum your pool super quickly
Every pool owner needs to know how to use a manual vacuum. Although an automatic pool cleaner provides hands-off pool cleaning, it does not help clear cloudy water or algae.
Here’s our in-depth guide to quickly and efficiently emptying an in-ground or above-ground pool so you can get back to swimming. Over time, dirt and debris will accumulate at the bottom of your pool and you will need to vacuum it to clean it. It’s easy to do it yourself with a pole vacuum head, vacuum hose, and telescopic pole. Whenever you do your routine pool cleaning and maintenance, it’s also a good idea to check the pressure gauge on your pool filter to see if it’s higher than normal, meaning it has accumulated debris, and backwash it. need to. Backwash your pool using a multiport valve and backwash hose to clean the filter and return it to normal operating pressure.
How to clean a pond
Swimming is a fantastic way to beat the summer heat. However, it is very important to properly clean and maintain the swimming pool. Improper care can lead to allergies and all kinds of water-borne illnesses. Proper pool cleaning will ensure the safety of swimmers as well as the comfort of swimming. If your pond is not surrounded by trees and you have the right equipment, pond cleaning is very easy. Follow the instructions below at least once a week and you’ll be cleaning your pool in no time. Check the pump and clean the filter The pump circulates the water around the pool and out. The pool pump works in conjunction with a filter that cleans the water. A filter helps maintain pool water quality and removes debris from the water. If the filters are not properly maintained and cleaned, they will not work effectively and the water may become contaminated. Skim Leaves Attach a leaf skimmer to the end of a telephone (a pole that can extend up to 24 feet (7.3 m)). Skim and remove any debris and leaves floating on top of the water.
Vacuum the pool Connect the vacuum hose to the pool pump suction intake, located on the pool wall. Some vacuums connect to the suction intake of a freestanding unit. Connect the other end of the hose to the extension stick of the vacuum unit. Attach the brush to the wand and vacuum the pool floor. Clean the walls Once a month takes a special brush and clean the walls on the surface of the water. This is where algae forms. The type of brush you use depends on what your pool is made of. If your pool is made of vinyl or fiberglass, you will need a nylon bristle brush. If it is made of concrete, you will need a stainless steel bristle brush.
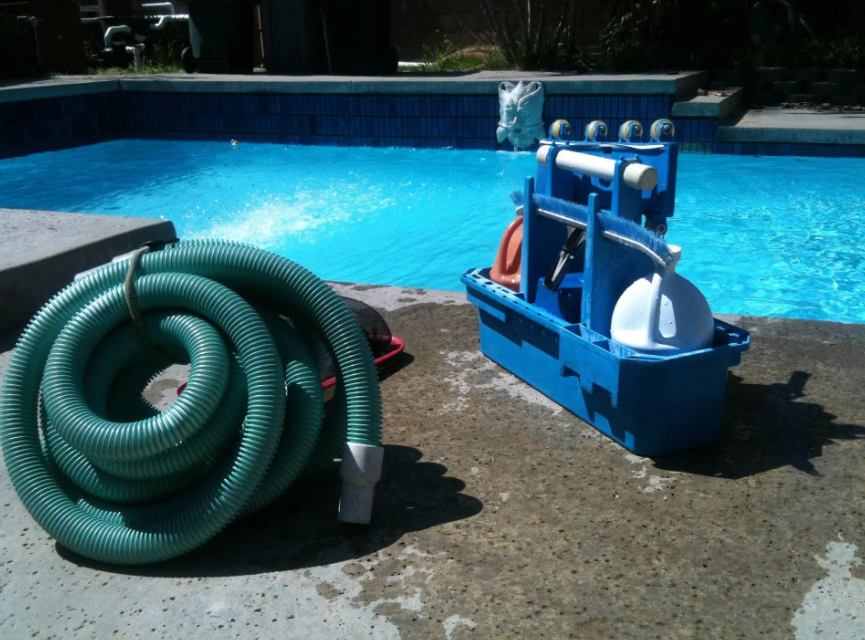
What you need to vacuum your pool.
- Pool vacuum head (also known as vacuum head).
- Telescope pole for attachment to space head.
- The pool vacuum hose is long enough to reach every area of your pool.
- Skim vac or vacuum plate (optional if you want to use a skimmer basket).
Types of Ponds
The main difference between the different types of pools is how the basin is constructed. There are many different styles of the pool, each with its own advantages and disadvantages.
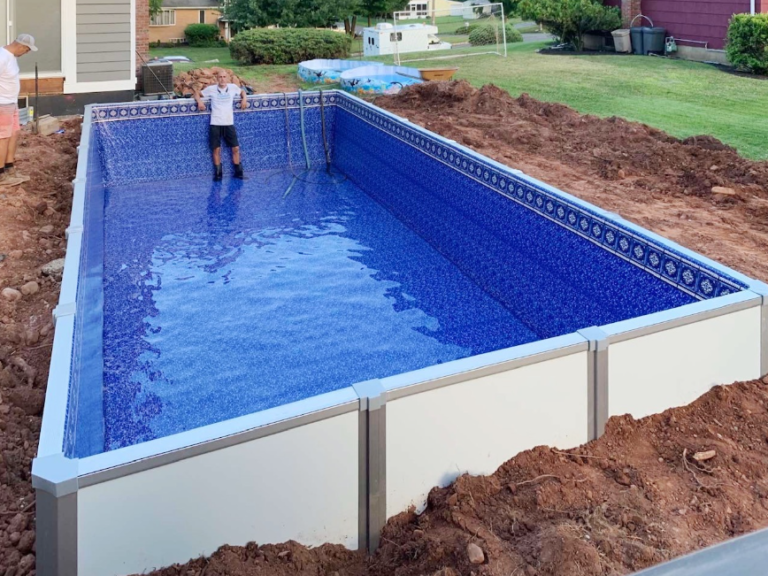
- Above-ground pools are the cheapest construction option, as well as the easiest to build. Most in-ground pools are built from prefabricated kits, which even a hobbyist can put together (although most people go with professional installers). First, installers level the ground to create a flat building surface. Then they assemble a frame track, which supports the outer wall (made of metal, plastic or wood). Next, they spread sand and lay plumbing in the pool area. Finally, they secure the vinyl liner to the pool walls, fill the pool with water, smooth the liner and fasten it in place. As soon as they hook up the pump and filtering system, the pool is ready to go. The main disadvantage of this type of pool is that it is less durable and generally less attractive than other designs. It’s also less permanent, which can be a good thing — it’s relatively easy to disassemble the pool and move it to a new location.
- Fiberglass pools are made from fiberglass-reinforced plastic, which is molded into the shape of a basin. To install a pool, a construction crew digs an appropriately sized hole, installs the necessary plumbing, adds some sand filler, and lowers the prefabricated pool structure into the hole. Then they level the pool, attach all the plumbing, and backfill the area around the pool. Typically, the pool is surrounded by a concrete deck structure.
- Vinyl-lined in-ground pools are structurally similar to above-ground pools, but they look like a more traditional in-ground design.
- Construction crews dig a hole and assemble a metal, plastic, or wood frame wall around the hole. As with an above-ground pool, crews fill the bottom of the hole with sand and secure the vinyl lining to the structural wall. These pools are much cheaper than other indoor designs, but not as durable. Generally, liners need to be replaced every 10 years.
- Gunite pools are the most popular design in most of the United States. To build one of these pools, construction crews dig a hole, put plumbing in place, and assemble the framework grid with 3/8-inch steel reinforcing bars (rebar). The rebar bars are spaced about 10 inches apart and secured with wire. When the grid is in place, crews spray a heavy coating of gunite, a mixture of cement and sand, around the rebar. The spraying unit mixes the dry gunite mix with water before spraying — this produces a wet concrete material. Crews smooth the gunite and let it sit for a week or more before applying a smooth finish to the rough surface. The most popular finish is called plaster (actually a mixture of cement and marble sand), but many people finish their pools with special concrete paint.
- Gunite pools can have tile, exposed aggregate, or even fiberglass finishes. Gunite pools (and their cousin, shotcrete pools) are extremely durable and can be made into any shape or size.
- Poured concrete pools are similar to gunite pools, but they are much more difficult to build. Instead of spraying concrete material around a rebar framework, the concrete is actually poured into traditional wooden forms. With the rise of gunite methods, poured concrete pool construction has largely fallen by the wayside. In masonry block pools, the walls are made of concrete blocks.
- Although these pool designs are quite different, they all rely on the same basic plumbing and filtering system. In the next few sections, we’ll see how these components actually persist in the pool.
- Floating pool
- An underground swimming pool looks like a solid, immovable structure, but it’s actually like a boat — it can float in the surrounding groundwater. When the pond is empty, groundwater pressure can actually push the structure out of the ground.
How Lawn and Garden Vacuums Work
Vacuuming leaves and other plant debris is a more accurate and less noisy way to clean your lawn.
Vacuuming leaves and other plant debris is a more accurate and less noisy way to clean your lawn.
After a few weeks go by without cleaning your kitchen floors, you notice that they have become very dirty. Food scraps are collected near the stove, your shedding dog’s fur has collected under your kitchen table, and dust bunnies have started to form in the corners. But don’t worry — you’ll get over it quickly. Grabbing a blow dryer from your hall closet, you turn it on and direct the airflow towards the accumulated dirt. It’s a bit tricky, but with enough practice, you’ll be able to blow all the mess into a nice, manageable pile that you can sweep into the trash.
Or you can just use a vacuum cleaner. Blowing dirt around your house would be a bit funny, wouldn’t it? But for some reason, that line of thinking has rarely reached yard work. Homeowners may use suction to clean their rooms, but outside they have no problem chasing leaves. In a heap, knowing full well that the slightest gust of wind could end their afternoon of careful assembly.
Long a tool of professional landscaping companies, lawn, and garden vacuums are slowly overtaking leaf blowers as the yard cleaning tool of choice. Often similar to swept lawn mowers, lawn and garden vacuums are essentially larger, more rugged versions of their indoor cousins. But where home vacuums may only be dealing with dust, dirt, and the occasional toenail, lawn, and garden vacuums have to deal with large amounts of leaves and pine cones.
This means that lawn and garden spaces are common. Built more ruggedly, the mechanics of both indoor and outdoor vacuums are similar. In the center of the vacuum is a small compartment with a high-speed fan, connected to the intake and exhaust hoses. As the fan rotates, the air is pushed out of the small box and into the exhaust fan. By pushing the air aside, a small, low-pressure area (known as a partial vacuum) is left behind in the compartment. Suction is created when air enters the intake hose to fill this space, and the leaves ride this jet of air like a stream of water. Although push mower types are the most common type of lawn and garden vacuum, they are also offered as small handheld versions, larger ride-on models, or as trailer attachments for small-scale tractors. Backpack models are good for clearing debris around trees and gardens, while larger, heavy-duty models can handle larger areas and pick up debris better. As with indoor vacuums, you’ll want to avoid large objects, including branches, twigs, and rocks, that can jam the machine. As you make your way around the yard, make sure your path is clear of any large obstacles. Some lawn and garden vacuums even come with a small wood chipper attached to the side, which will allow you to easily dispose of any stray twigs that come your way. You’ll also want to make sure the intake “muzzle” on your vacuum is properly adjusted to the ground. When walking over tall grass or bumpy terrain, raise the muzzle so it doesn’t bump against the ground. If not, move the intake as close to the ground as possible. The shorter the distance between the intake and the ground, the greater the suction.
The most prominent feature of any lawn and garden space is the collector bag. While lawn mowers can be found with relatively small collector bags, lawn and garden vacuums have larger bags of up to 12 cubic feet (0.34 cubic meters) designed to handle large amounts of waste. . Collection bags are often too heavy and awkward for one person to lift and dispose of, which is why most bags come with a closed or zippered door so you can manually remove the debris. What if, instead of leaves and lawn clippings, your yard is littered with plates and plastic forks from your child’s birthday party? In some cases, lawn and garden vacuums will be powerful enough to suck up not only organic waste but also glass, plastic, and metal. But be sure to check the owner’s manual for your vacuum before trying to tackle heavy-duty litter: If it turns out your machine can’t handle leafless material, you might be setting your lawn on fire. Before application, sweep thoroughly. Would like to scan by type. Vacuum your lawn. As with most yard equipment, you’ll want to avoid using your lawn and garden vacuum in the rain or right after a storm. When leaves are wet, they are difficult to pick up, and you will also have to suck up large amounts of water into the collector bag.
Before you buy a lawn and garden vacuum, it’s a good idea to “test drive” one of the machines in a familiar area. Go to a local lawn and garden store and rent a vacuum for the weekend. If you like what you see, you can easily shell out cash for your lawn and garden space. Some dealerships even offer “demonstration yards” where you can take the vacuum for a spin. Also, decide whether you need a machine with wheels or a portable, bag-style vacuum. If you want to clear leaves from flower beds and other hard-to-reach areas, you’ll need the flexibility of a bag-style machine. However, if you want to clear leaves from the backyard or the soccer field, you’ll want to pick something with wheels.
Some bag vacuums also come with the ability to act as a leaf blower, which may affect your choice.
Lawn and Garden Vacuum Equipment
You’ll need something to store all the empty addresses.
You’ll need something to store all the empty addresses.
You wouldn’t go out in a canoe without a life jacket and a paddle — Likewise, you’ll want to pack a few pieces of equipment before you finish mowing your lawn and garden.
Not all debris is created equal, and that’s why most portable lawn and garden vacuums have a range of nozzles and attachments to help you get into tight spaces.
If you’re working in precise or delicate areas like a garden, you’ll want to avoid using a large intake nozzle that could cause damage. Or, if you’re picking up heavy debris, like pine cones, you may need a smaller nozzle to provide more suction. Chances are your lawn and garden vacuum will come with all the essentials. If not, special attachments should also be available through the manufacturer or your local home and garden center. If you’re using a push-variety lawn and garden vacuum, you may also be able to attach a larger “wonder” hose, which lets you vacuum up stray pieces of debris as you make your way around your backyard. Can provide flexibility.
Or, if you only need to use the device for an hour at a time, you can ditch the cord altogether and find yourself a cordless, battery-powered machine.
Many large lawn and garden types collect mulch as well as debris. The result is that your yard waste will be much denser when you scoop it out of the machine’s collector bag. When you used a rake or leaf blower, you would have filled six bags full of loose leaves. Now, you may find that you are only filling two or three bags with mulch. Of course, bags of mulch will be heavier than bags of leaves, which is why you’ll want to make sure that you
Lawn vacuums can sometimes be quieter than leaf blowers — but the reality is that you’re usually dealing with a gasoline engine without a muffler. To avoid damaging your ears, pick up a pair of industrial earmuffs. In a pinch, foam or paper earplugs will do just as well. If you have the quieter (and cheaper) option of an electric vacuum, ear protection won’t be necessary, but you’ll want to make sure you have an extension cord long enough to run around the yard. If you plan to take the mulch to the trash or leave it at the curb for municipal pickup, have extra-strong trash bags. Or, if you’re looking to reuse mulch in your garden, make sure you have a large container for storing plastic trash.
How to Vacuum a Pool
Vacuuming your swimming pool is a great way to keep your pool clean and free of dirt and debris. Sure, it’s a little work, but the benefits of vacuuming are worth the effort: You’ll spend less time-fighting algae, your pool water will stay balanced, and your chemicals will work more efficiently. Your pool will look nicer, too.
Ready to add vacuuming to your inground or above-ground pool maintenance routine? It’s easy. All you need is a few essential pieces of equipment and a good vacuuming technique.
Filters
Leave the multiport sand in the normal filter position. “Backwashing” is necessary (see Backwashing page).
DE – If it doesn’t have a multiport, you should “bump” the filter (see backwashing page).
Cartridge- No pre-filter adjustment is required, but you should close the cartridge when done.
Skimmer
Choose a skimmer that is close to the pump and filter. It’s entirely possible to vacuum with any skimmer, but the one closest to the pump and filter will give you the most suction.
Close the skimmer slide plate (found under the basket, just below the skimmer). You’re not going to get out of it. Close the slide plate 1/4. This will increase the suction of other skimmers. You can open this plate to get less vacuuming suction or close it to get more. You should do this after your vacuum is fully connected so that the vacuum head does not suck to the bottom of the pool. Replace the basket.
Vacuum hose
Attach a skim vacuum to one end of your vacuum hose and place that end next to the skimmer (with the basket in the skimmer) that you are going to vacuum. Pull the hose into the pool and connect the other end to the pool return jet.
Place the skim vacuum on the top edge of the skimmer and let it hang there so you can see when the hose is full of water.
While filling the hose with water, move the other end of the pole until you hear or hear water coming out of the end with the skim vacuum on it. Attach the end you just filled to your vacuum head and pool and let your vacuum head sit under the pool.
Take the end with the skim vacuum on it as quickly as possible (make sure the hose is full of water, you can dunk the skim vacuum in the pond and put a little more water in the hose), remove the basket Give and place it in the skimmer.
You are vacuuming! The vacuum head is sucking in water and dirt. Move it slowly to the bottom of the pool. You can check your amount of suction by bringing the vacuum head close to the top (never pull the vacuum head out of the water – you’ll lose suction along with the prime). By feeling the water being sucked in with your hand, you can adjust the suction.
To finish vacuuming, fully open the slide plate (on the skimmer you are not vacuuming). This will release most of the water pressure on your skim vacuum. Vacuum the skim out of the skimmer.
Hi – just got back from a long holiday in August, and while away I had an email from a customer about their Threadbare Winter Pool Cover.
A drawback to the old mesh safety cover is that it lets in too much light and dirt. Vacuuming in the spring is a big task, especially since the DE filter was attached to a push-pull type valve, with no ‘vacuum to waste’ option.
Vacuum to waste basically means that the pump pushes water into the filter valve, which bypasses the filter sand, grid, or cartridge and diverts it straight to the waste line.
There are different ways to vacuum the pool to waste, depending on what type of filter valve you have – a multi-port valve or a push-pull (also called a slide) valve, or even if There is no filter valve.
Once you have all your supplies ready, it’s time to get started. Follow the steps below to manually vacuum your above-ground or inground swimming pool:
Step 1: Assemble Your Pool Vacuum
It’s quick and easy to do. Attach the vacuum head to your telescope pole (remember, it should turn on easily).
Step 2: Connect the vacuum hose.
Connect one end of the hose to the vacuum head and the other end to your skimmer using the vacuum plate. (Remember to unload the skimmer basket first!)
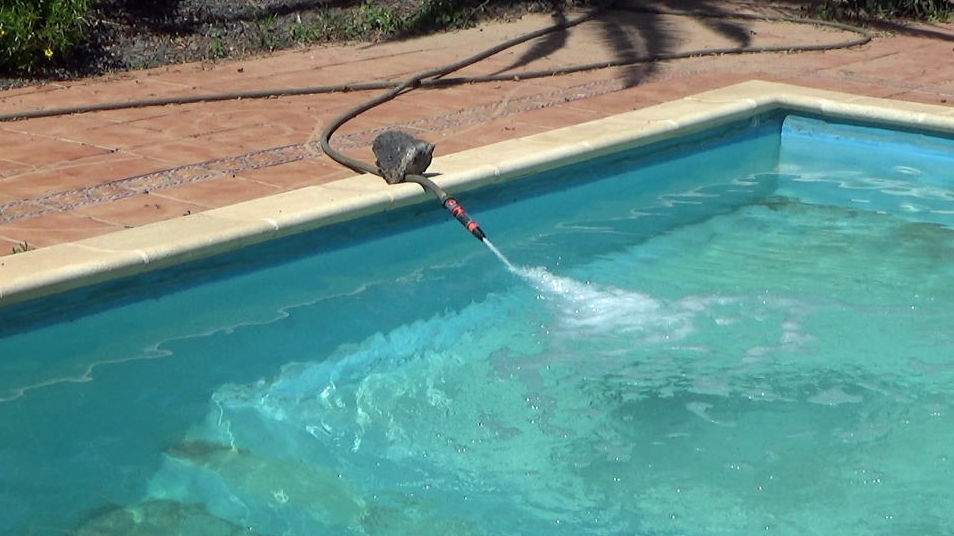
Before you connect the pool vacuum hose to the skimmer, you need to bleed it. The easiest way to do this is to hold the hose against one of your pool jets until you see air bubbles coming out of the hose.
Step 3: Choose your filter valve configuration.
For light vacuuming, you can leave your multiport valve filter set to “Filter”. For big jobs and large amounts of debris, set your filter system to the “waste” setting, which sends the water down the drain instead of through the filter.
Refill as you go.
When using the “waste” setting of your pool filter, you may notice your pool water level drop. To properly fill your pond, use a garden hose to ensure a constant flow of fresh water and keep your water level.
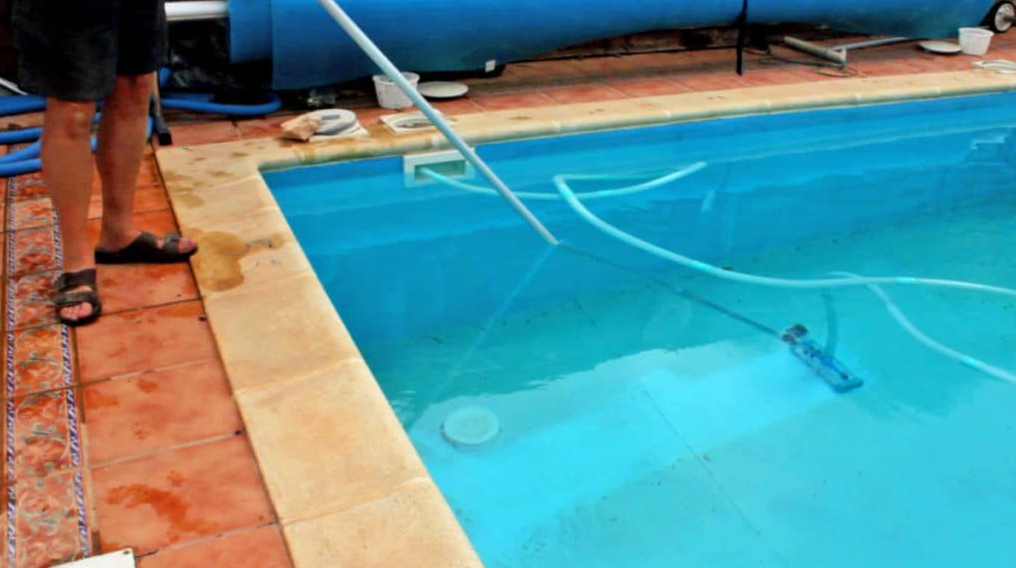
Step 4: Start vacuuming.
Move the vacuum as if you were a real vacuum on the carpet, in slow linear passes (going too fast will just stir the dirt without sucking it). If the pool is particularly dirty, you may need to stop and empty the pump strainer before continuing. Repeat this process as often as you need to remove all debris from your pool floor.
Step 5: Disconnect, change filter settings and perform a final cleaning.
Once your pool is empty to your satisfaction, you can disconnect your vacuum head and hoses. Be sure to clean the bottom of the skimmer, If you’ve changed your filter pump settings, be sure to change them back (and if you’re using sand or DE filter, now’s the time to do a quick backwash). For the finishing touch, apply a brush to your telescoping pool and give the pool floor and sides a good scrubbing.
Pro tip: To make sure your pool water remains balanced, test your water after vacuuming your pool.
Pool drain system
We have already seen that swimming pool water needs to be circulated through a filtering system, to remove dirt and debris. During normal operation, water flows into the filtering system through two or more main drains at the bottom of the pool and multiple skimmer drains at the top of the pool. Main drains are usually located at the lowest point of the pool, so the entire surface of the pool slopes toward them. Most of the submerged dirt and debris exits the pool through these drains. To prevent people from getting their hair or limbs caught in the plumbing, drains are almost always covered with grates or anti-vortex covers (a cover that diverts the flow of water to prevent dangerous eddies from forming). ). Skimmers draw water in the same way as main drains, but they only suck from the very top of the pond (usually the top eighth of an inch). Any debris that floats — leaves, sunscreen, hair — leaves the pond through these drains. The diagram below shows a common system. To capture debris effectively, the goal is to skim only the surface area. The water flows through a strainer basket, which catches any large debris, such as twigs and leaves. In addition to the main inlet, the skimmer system has a secondary equalization line that leads below the surface level to the drain. If the water level falls below the level of the main inlet, this line prevents the skimmer from feeding air into the pump system. Water is pumped through.
In the system described here, a floating, inlet gate swings in and out to let in very small amounts of water at a time. Returning to the filtering system and return, inlet valves on the sides of the pool. This system involves a lot of suction, but if the pool is built and operated properly, there is virtually no risk of someone getting caught against a drain. The only way a plumbing system can implement such suction is if there is only one open drain. In a protected pond, there is always more than one main drain as well as several skimmer drains, so if someone or something blocks one drain, the pumping system will draw water from one of the other drains. This eliminates suction on the blocked drain. Most swimming pools also have a couple of vacuum ports, which are used only for cleaning the pool. These ports connect to pool vacuum cleaners, which work like regular vacuum cleaners except they suck water instead of air. Vacuum ports may have their own pumping system, but in most pools they are powered by the main pump.
After making its way through various channels, the water flows to the filtering stage. In the next section, we will explore what pumping and filtering systems are. The filters in this system are high grade sand filters. Sand filters consist of a large tank, made of fiberglass, concrete, or metal, containing a thick bed of special grade sand, square in shape.
During the filtering operation, wastewater from the pool enters through the filter inlet pipe, which leads the water distribution head into the tank. While gravity pulls the water down through the sand, the tiny sand particles trap any dirt and debris. At the bottom of the tank, the filtered water flows through the pickup unit and out the outlet pipe. Over time, the dirt and debris that accumulates in the sand slow down the flow of water. Pressure gauges at the filter inlet and outlet allow the pool protector to gauge the level of obstruction inside. If the gauges show a much higher pressure on the inlet pipe than on the outlet pipe, the supervisor knows that there is too much debris in the sand. This means it’s time to backwash the filter. To backwash, the supervisor adjusts multiple valves to redirect the water flow. He closes the return pipe leading to the pond and opens the drainage pipe, which leads to the sewage system. He adjusts the valve in the filter to connect the pump to the outlet pipe and the drainage pipe to the inlet pipe. With this arrangement, water from the pump pushes upward through the sand, removing dirt and debris. At the top of the filter tank, the wastewater exits the inlet pipe into the sewer.
To redirect the flow of water for backwash, the supervisor turns the large handles to adjust the plumbing valves.
To redirect the flow of water for backwash, the supervisor turns the large handles to adjust the plumbing valves.
In place of a sand filter, some pool systems use diatomaceous earth filters or cartridge filters. In a diatomaceous earth filter, water from the pool passes through a filter grid. Coated with diatomaceous earth, a fine powder that is chemically inert, made from the fossilized remains of marine organisms called diatoms. In a cartridge filter, wastewater passes through a filter made of polyester fabric or corrugated paper. Instead of backwashing, you simply remove the filter and turn it off. After a few years (or as many as eight years), it’s time to discard the old filter and install a new one.
In most areas, the law dictates that all pool water (or more accurately, an equivalent volume) must pass through the filter in a certain amount of time. Usually between 30 minutes and six hours. For the apartment complex pool above, that means pumping 167,000 gallons (630,000 liters) of water through the filtering system every six hours!
A pump and filter system is also connected to a well or municipal water line to add fresh water to the pool. This is necessary to replace water lost from evaporation, backwashing, and “splashout” (water that splashes onto the deck or onto people’s bodies and swimsuits). When it’s very hot and there’s heavy swimming activity, this 167,000-gallon pool can lose 300 gallons (1,100 liters) or more a day.
Next, we’ll look at the chemicals at work in a typical swimming pool.
Can vacuuming remove algae from a swimming pool?
Algae can be difficult to remove, especially once it finds a home in the nooks and crannies of your swimming pool. While vacuuming alone can’t remove all the algae in your pond, it can help prevent algae: By promptly removing debris such as leaves and other organic matter, you can keep your pond water clean and healthy. are discouraging the growth of algae. If you are dealing with algae or cloudy water, change your filter valve settings to the waste setting if you have a multiport valve or a push/pull valve. This will bypass your filter and send the waste water out through the waste port. If you have a cartridge filter, simply remove the drain plug and attach the backwash hose. When you vacuum, the water level in your pool will drop. Use a garden hose to add fresh water while you’re vacuuming.
A step-by-step guide to installing and cleaning your pool with a manual pool vacuum
Before starting, make sure the pool pump and filter are running. You also want to make sure you’re running at a good starting pressure. If you have D.E. Or sand filter and the pressure is high, backwash it. If you have a cartridge filter, make sure the cartridges inside are clean and ready to go. Here’s our complete guide to cleaning all types of filters.
Pool Vacuuming FAQs
How often should I vacuum my swimming pool?
In general, it’s a good idea to vacuum your pool once a week. You should vacuum your swimming pool whenever you notice large amounts of debris, dirt or leaves on the pool floor (for example, your pool may need vacuuming after a heavy storm).
Why do I need to vacuum my pool if I have a robotic pool cleaner?
If you’ve ever seen your robotic pool cleaner push a pile of waterlogged leaves from one end of your swimming pool to the other, you know what we’re talking about: robotic pool cleaner light. are best for, Daily maintenance, but they are not designed for heavy lifting. If debris is not removed promptly, it can destroy your water quality and lead to maintenance problems such as algae. A pool vacuum makes short work of heavy debris, helping you keep your pool clean and inviting and preventing maintenance headaches.
Frequently Asked Questions About Vacuuming Pools
Looking for more help with your pool vacuum cleaner? Here are some common questions and answers.
- What setting do you put your pool filter on when vacuuming?
If you’re only vacuuming light debris, you can put it on the “filter” setting. But if your pool is really dirty, it’s best to set the filter to the “waste” setting (not “backwash”) to bypass the filter while vacuuming. The filter is now powerful enough to remove debris quickly.
- Do you backwash or vacuum the pool over waste?
If you are emptying a lot of heavy debris from your pool, your filter setting should be changed to “waste”. Do not use the “backwash” setting. The goal is to completely bypass the filter that sorts out the “waste.” Backwashing reverses the flow of water through your filter to clean it.
- Do you leave the skimmer basket in the vacuuming pool?
If you use a skimmer vac plate, you can keep the skimmer basket in place while vacuuming. Otherwise, remove the skimmer basket before connecting your vacuum hose to the skimmer inlet or if you are using a vacuum plate. The skimmer basket will get in the way and not allow you to create good suction.
- Dirt comes back when I empty my pool?
This is because your filter system is not powerful enough to filter out the debris quickly enough. If you’re dealing with a lot of fine debris that’s getting through your filter, change your filter setting to “waste” and bypass the filter altogether when you vacuum. Be sure to fill with fresh water when vacuuming so the water level in your pool is not too low.
Vacuuming to Waste: How and What
Multiport Valve:
For multiport valves, which have 6 settings, set the valve handle to the “waste” or “drain” position. Roll out the backwash hose if you have one, and start vacuuming as soon as you can manage. Remember, the water level is falling!
Push Pull Valve:
Push-pull valves use a piston with two discs and have only two settings, filter or backwash. In the down position, water is directed through the tank on filter mode, returning to the pool after exiting the filter tank. In the up position, water enters the waste line as it exits the filter. (Pac-Fab push-pull valves have a reverse operation, up for filter, down for backwash).
Since there is no “drain” setting on the push-pull valve, there seems to be no way to vacuum the filter to waste with the slide valve – or is there one?
For DE filters, you can remove the grid assembly and firmly reattach the filter tank, making sure the clamp is properly positioned and very tight. Open the air bladder and set the push-pull to the backwash position. Adjust your skimmer and main drain valves for maximum suction through the skimmer, and voila! You can vacuum to dispose of the pool. If the push-pull plunger drops down, in the filter position, use vise grips or a small wrench to hold it in place.
For sand filters using a push-pull valve, you cannot remove all the sand. There doesn’t seem to be a way to vacuum the sand filter for disposal – or is there?
There is a way, but it can be dangerous, so read carefully. Remove the plunger from the slide valve housing or body by loosening the large union nut at the bottom of the handle, and the small bolt or nut at the top.
Clean any lubricant from inside the valve body. Then insert a rubber expansion plug, usually #11 or #12, down into the valve body. Tighten it completely with pliers, and do not stand on top of the plug, which would be dangerous from bursting under pressure. Make sure the backwash hose is not kinked and open the filter air blower before starting the pump. A straight-sided pressure testing plug holds more firmly than a tapered winterizing expansion plug.
No valve:
Cartridge filters do not have a backwash valve at all. Since you don’t backwash them, you remove them and spray them with a garden hose. There seems to be no way to vacuum the waste with a cartridge filter – or is there?
Option #1 is to remove the filter cover, remove the cartridge, and replace the cover securely, fully tightening the clamp. Remove the drain plug and thread into the 1.5″ hose adapter and backwash the hose with a clamp. Route the backwash hose to a storm drain or an area that is not drained or oversaturated. Don’t flood the neighbors!
Option #2 is to install a 3-way valve in the pipe between the pump and the filter. Pac-Fab 3-way valves are under $30, and the only other materials needed are a bit of pipe and some PVC glue and primer. Use a hacksaw to cut about 5″ of PVC pipe between the pump and the filter, leaving 2-3″ of clear pipe on either side to attach the new valve. You may need help separating the pump and a bit of the filter while you glue the new valve in place. Reset the valve cover to allow water to flow straight through the valve for normal filtration.
Or make a sharp 90° turn and exit through Port #3. Glue a short piece of pipe to the valve, and attach a length of backwash hose to the pipe. Turn the valve whenever you want to vacuum the waste on the cartridge pool filter, or when you need to reduce the water from heavy rain.
Checklist: Pool vacuuming is a must.
Before vacuuming your pool, you should make sure you have everything you need to get the job done. What you’ll need to get started:
Vacuum head and telescopic pole. If you have a swimming pool, chances are good that you already have a telescopic pole, in addition to interchangeable attachments such as nets, skimmers, and brushes. Most swimming pool vacuum heads are designed to work with any telescopic pool. First, make sure the pump and filter are running. Attach the vacuum head to the open end of the telescoping pole. Connect one end of the hose to the empty end. If the hose is slipping, use a hose clamp to hold it in place. A telescopic pole is an extendable pole that screws onto various attachments. Attach the vacuum head to the pole and then push 1 end of the vacuum hose into the raised round opening for the hose.
Make sure the hose is long enough to run around your pool and cover all of the pool’s bottom surface.
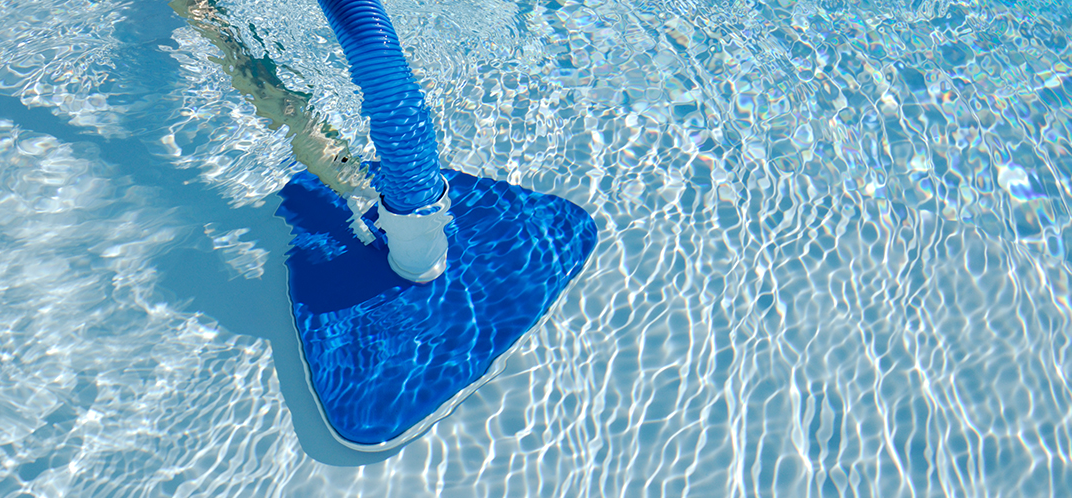
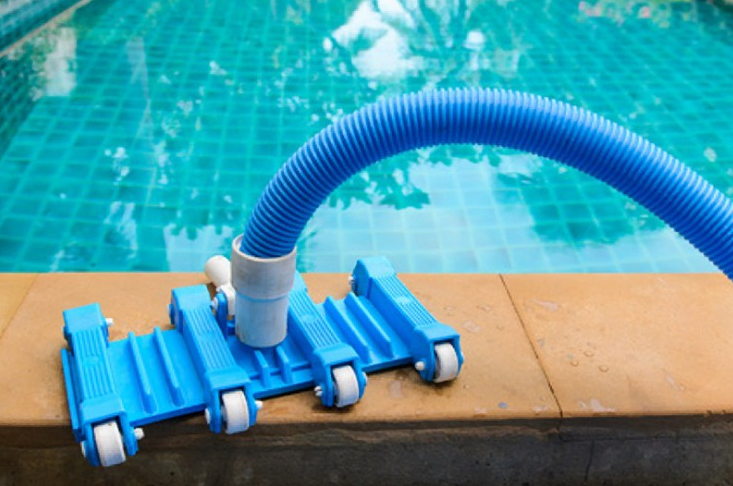
A pool vacuum head is a simple vacuum head with a screw-in hole. It has a pole or other attachment, as well as a cylindrical hole for the hose that sticks to the head that you push the hose over. They come in a variety of shapes, from rectangular to triangular. You can get one online or at a pool supply shop.
First, remove the vacuum hose from the skimmer: this is an important step that prevents air from being sucked in by the skimmer and filter pump. Be sure to always keep the vacuum submerged in water and never take it out before first disconnecting it from the skimmer.
Pull the basket out of the pool skimmer. A pool skimmer is one that sucks loose debris from the surface of the water and filters it before it has a chance to sink to the bottom. Locate the intake for the skimmer at the edge of the pool near the top of the deck, remove the plastic cover from the pool deck near the intake, and pull out the basket.[4]
This will expose the suction hole of the skimmer that you need to use to vacuum your pool.
. Work the vacuum across the width of the pool: This may just be a personal preference, but I find it’s much easier to start at the shallow end of the pool and vacuum a portion of the width of the pool rather than going the length. This way you can make sure you don’t leave any space in between.
Place the open end of the hose into the open suction hole in the skimmer. Place your hand on the open end of the hose and hold it up so that all the water is in it when you pull it out of the pool. Lower it into the water where the skimmer basket was, place your hand against the opening until it is under water, and place the opening of the hose into the suction hole.
This will provide suction to the vacuum hose allowing you to vacuum the bottom of your pool with the vacuum head.
Vacuum hose. The vacuum hose connects your vacuum head to your pool pump through the skimmer inlet, which provides the suction power for the debris. Fill the vacuum hose with water to remove the air.
Place the vac head, telescopic pole, and hose into the pool, making sure the vac head is at the bottom of the pool. Place the other end of the vacuum hose against the return jet in the pool. This will push the water through the hose and expel all the air.
Triple-check to make sure the vacuum inlet to the pump is the only line open. If not, particles and debris will also be sucked up by the pump and undo all your hard work. You will see the floor from the run and pole without air bubbles from the head. They had an air bubble stop, all air without a hose.
Adjust appliance valves for better suction: A typical appliance setup has a valve on the filter pump that controls the amount of suction on both the pool’s skimmer line and the floor/wall drain. Once you have connected the manual vacuum to your skimmer line you can adjust the amount of suction on the vacuum by adjusting the valve in the device. Make sure you don’t completely block the wall/floor drain. The vacuum will restrict the flow of water through the equipment and if it does, the pump will eventually cavitate. Just close the wall/floor drain valve until you hear the pump start to heave, then back off a bit.
Fill vacuum hose with water: After attaching the empty head and hose to the pole, submerge the entire hose into the pool to completely fill it with water. Another easy way to do this is to attach the other end of the vac hose to the return jet in the pool. Once the vacuum head stops bubbling air, it will rest at the bottom of the pool. Now you can insert the hose into the skimmer line without having to suck air through the pump.
Turn off the heater: Most pool heaters require a large amount of water to run through them to operate properly. Using a manual vacuum can restrict water flow and damage your heater. Make sure the filter pump is primed and running at high speed before turning the heater back on.
Vacuum plate. It’s also called a “skimmer plate,” but don’t let the names confuse you. Whatever you call it, this piece of equipment connects the hose to the skimmer inlet.
Choosing the Right Vacuum Head for Your Pool Liner
Vinyl pool liners require a vacuum equipped with a soft brush to prevent tears and damage. If you have a concrete or granite swimming pool, choose a vacuum head that has wheels for easy movement.
If you’re looking for some more DIY pool maintenance video tutorials, invest in our Pool Care Video Course by Swim University®. We’ll show you the proper way to connect your manual vacuum and vacuum your pool effectively so you can spend more time swimming.
How to Use a Pool Vacuum
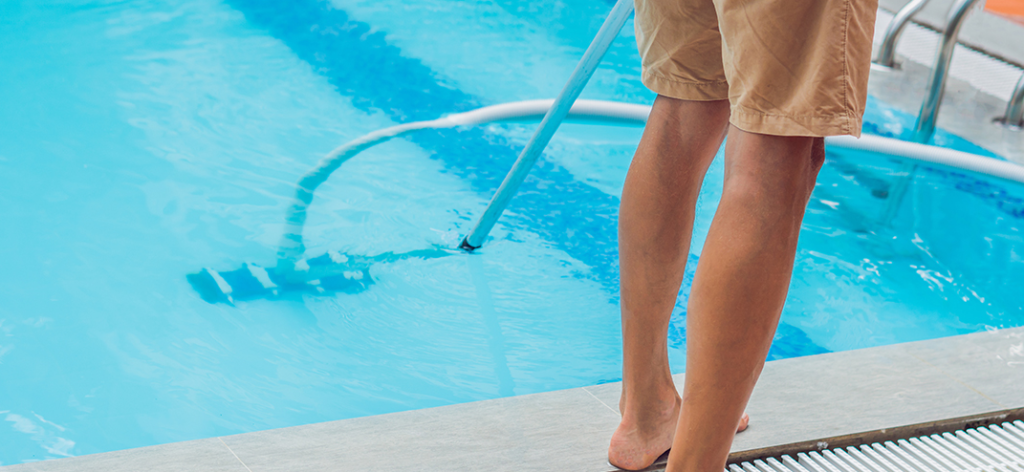
Using a pool vacuum makes cleaning the pool floor easier, by sucking up all the dirt. There are two types of pool vacuum cleaners that you can choose from, manual or automatic. In this article, we will deal with manual type. A pole vacuum consists of a vacuum head, a vacuum hose, and a telescopic pole. Let’s continue now and learn how to use a pool vacuum.
- Attach the vacuum head to one end of the telescopic pole. This allows you to move the vacuum head around the bottom of the pool. There should be a clear spot at the top of the head where you attach it to the pole.
- Connect one end of the vacuum hose to the vacuum head.
- Hold the pole in your hand and lower the vacuum head into the pool with the hose. Make sure the other end of the hose is outside the pool.
- Locate the filter skimmer (where the water enters the pool) on the pool wall.
- Attach the other end of the hose to the water intake nozzle. It will send water through a hose. You will see air bubbles rising from the vacuum head. Once the hose is filled with water, no bubbles will come out. At this point, suction will be created and the head will become flat and narrow on the pool floor.
- Switch the filter nozzle to intake mode (water suction) and then guide the vacuum head along the floor using the telescopic pole. You will see that dirt is suppressed.
Telescopic swimming pool
Make these hard to reach areas with your leaf net, vacuum or brush. This professional-grade telescopic pole is what experts use to thoroughly clean pools.
Frustrated by adding chemicals and trying to keep your pool clean all the time?
We demystify all the pool care confusion in this easy-to-read picture book and video course. This will help you save $100’s on pool maintenance right away!
Connect the vacuum hose to the pool skimmer.
Attach the skim vac plate to the end of the hose you previously placed against the return jet, block the opening with your hand, and bring it to the skimmer. Pour it into the skimmer on top of the basket and make sure to make a good seal or the suction will be lost.
If you are not using a vacuum plate, remove the skimmer basket from the inside.
Use your hand to stop the end of the hose filled with water. Then place the hose into the skimmer inlet, making sure it is firmly inserted into the suction hole at the bottom of the skimmer.
Whichever method you choose will create suction that pulls the material through the vacuum head, through the hose into the skimmer, and then through the filter system. If your vacuum loses suction, follow the reconditioning steps to restore it.
Start vacuuming.
Now that you’ve created a powerful siphon using your filter system, you can vacuum your pool floor. Start at the shallow end (if you have one) and work your way to the deep end of the pool. If you have a round pool, just start on one side and move to the left or right floor.
Use long, slow, sweeping strokes to clean. Make sure your strokes overlap slightly so no debris is left behind. Rushing will raise debris, reducing visibility and taking hours to reseat.
If the water becomes cloudy, give it two hours to settle, then come back and vacuum again, repeating as needed.
If the vac head gets stuck, turn off the pump for a second to break the vacuum force and free it. Also, be sure to monitor your pool filter’s pressure gauge while vacuuming. If the pressure rises above the manufacturer’s recommended level, take a break, and backwash your filter.
Don’t like vacuuming your pool by hand? Here are our favorite automatic pool cleaners.
First, welcome to the club! Although some people think it is a form of meditation, it is still work. And thankfully we live in a world of evolving technology. I can help you do this with a swimming pool vacuum that works like a robot.
1. Robotic Pool Cleaner
Autonomous cleaners that vacuum your pool using electricity. You plug them in, drop them in your pool, and let them do all the hard work themselves. All you have to do is empty the built-in filter bags when they are full of debris. These are by far the best automatic pool cleaners on the market, but they can be a bit pricey. Hey, you get what you pay for.
2. Pressure side pool cleaner
These cleaners connect to your return line and use the water pressure from your filter system to move the automatic cleaner around the bottom of your pool to pick up debris in the filter bag.
We highly recommend investing in a Polaris Pool Cleaner.
- Polaris Wake Sweep 65 Pressure Side Pool Cleaner for Above Ground Pools
- $209.99
- Attaches to the pressurized area of your pool and uses a patented jet sweep assembly to loosen and remove dirt and other particles from hard-to-reach areas. It also has a trailing all-purpose debris bag that pulls some of the larger items that break loose from the pool floor.
Polaris Vac-Sweep 360 Pressure Side In-Ground Pool Cleaner
- $579.00
- The Polaris 360 Automatic Pool Cleaner improves water circulation and helps mix chemicals and heat while it cleans the bottom and walls of your pool. It’s powerful enough to pick up large objects like leaves and pebbles, trapping the debris in its filter bag.
3. Suction side pool cleaner
This is just an automated version of manually vacuuming your pool. They hook up the same way you manually vacuum your pool. However, the biggest difference is that they move around the bottom of your pool themselves. That way, you don’t have to stand there in the hot sun and do it yourself.
However, we recommend that if you are going to make this investment, you go for a pressure side or robotic cleaner. That said, here are our favorite suction-side automatic pool cleaners:
Pentair Creepy Crowley EZ Vac Suction Side Above Ground Pool Cleaner
- $249.80
- This Creepy Crowley pool vacuum connects directly to your pool skimmer line and is powered by your pool pump, using an internal free-skimming valve to automatically regulate water flow, ensuring, However, the unit is cleaning at a suitable speed.
Creepy Crowley Suction Side Automatic In-Ground Pool Cleaner
- $350.99
- It connects directly to your pool filter system and includes a 32-foot hose. It’s powerful, balanced, and has no hammering noises (common with other suction-side pool cleaners) for quiet operation.
Pool Chemical
An automatic chlorine feeder pump and filter system are installed.
An automatic chlorine feeder pump and filter system are installed.
A pond’s filter system does the heavy lifting in keeping the water clean, but it takes chemistry to fix it. It is important to carefully balance the chemical balance in pools for several reasons:
- Dangerous germs, such as bacteria, thrive in water. A pool filled with untreated water will be a perfect place for disease-carrying microorganisms to be transferred from person to person.
- Water with the wrong chemical balance can damage different parts of the pool.
- Imbalanced water can cause skin and eye irritation.
- Improperly balanced water can become very cloudy.
- To take care of pathogens in water, you need to introduce a disinfecting agent that will get rid of them. The most popular pool sanitizing agent is chlorine, in the form of chemical compounds such as calcium hypochlorite (a solid) or sodium hypochlorite (a liquid).
- When the compound is added to water, the chlorine reacts with the water to form various chemicals, most notably hypochlorous acid. Hypochlorous acid kills bacteria and other pathogens by attacking lipids in cell walls and destroying enzymes and structures within the cell through oxidation reactions. Alternative disinfectants, such as bromide, do essentially the same thing with slightly different results.
- Chlorine is usually produced in liquid, powder or tablet form (although some professionals use gaseous chlorine), and can be added to the water at any point in the cycle. Pool experts generally recommend using a chemical feeder to add it after the filtering process. If it is added directly to the pool, using tablets in skimmer boxes, for example, chlorine is highly concentrated in these areas.
- One problem with hypochlorous acid is that it is not particularly stable.
- It can degrade when exposed to the sun’s ultraviolet light, and it can combine with other chemicals to form new compounds. Pool chlorinators often include a stabilizing agent, such as cyanuric acid, which reacts with chlorine to form a more stable compound that does not degrade as easily when exposed to ultraviolet light.
- Even with a stabilizing agent, hypochlorous acid can combine with other chemicals to form compounds that are not very effective sanitizers. For example, hypochlorous acid can combine with ammonia, which is found in urine, to produce, among other things, various chloramines. Not only are chloramines poor sanitizers, but they can also actually irritate the skin and eyes and produce unpleasant odors. The distinctive odor and eye irritation associated with swimming pools are actually caused by chloramines, not common hypochlorous acid — a strong odor usually means there is too little chlorine. (hypochlorous acid), rather than too much. To get rid of chloramines, pool keepers have to shock pool treatments — add unusually strong doses of chemicals to clean out organic matter and unhelpful chemical compounds.
- Chloramine formation is related to another major factor in pool chemistry, maintaining the correct pH in the pool.
Skim Wake Pool Skimmer Plate
This optional plate allows you to keep your skimmer basket in place while you manually vacuum your pool. Without it, you will have to remove the skimmer basket.
Disconnect the vacuum and perform a final clean.
- Once you’ve vacuumed your entire pool, it’s time to clean up and get back to swimming.
- Remove the vacuum head from the telescopic pole, and drain the water in the vacuum hose. Attach your cleaning brush to the pole, and use it to clean any algae, dirt, and debris from the sides of the pool.
- Clean out any debris in your pump strainer basket, and backwash the filter if you have a multiport valve and use the “filter” setting. Here’s our complete guide to cleaning your pool filter after you’ve finished vacuuming.
- If you used the “waste” setting to vacuum the pool, make sure you switch the valve back to the “filter” setting and keep adding fresh water to your pool until the water level is restored…
- Once you’ve topped off your water, test your pool water, and adjust your alkalinity, pH, and chlorine as needed.
- Rinse all your equipment with fresh water, dry it, and return it to storage. This will help keep it in top working condition and prevent unnecessary wear and corrosion.
- You don’t have to fear the empty head! When it’s time to empty your pool—whether you’re just the hands-off type or fighting an algae infestation—you can get to work.
Need more help with pool maintenance?
Download our free pool care cheat sheet. This is a free, easy-to-use guide to help you keep track of your pool maintenance.
Subscribe to our Swim University YouTube channel. We publish free video tutorials throughout the pool season.
Check out our pool care course. You’ll find 30+ step-by-step videos and a downloadable guide that covers everything you need to know about pool care.
Continuing to maintain your swimming pool involves several things, including chemical balancing, equipment testing, and cleaning your pool. By far the most common way to remove dirt and debris from a swimming pool is to vacuum the pool steps, benches, and floor. Here are a few reminders to consider the next time you vacuum your pool.
How to Vacuum to Drain a Pond:
- Fill the pool before starting, and run the hose while vacuuming.
- Turn off the pump and switch the multiport valve to the drain-to-waste position.
- The faster the vacuum is possible, the faster the water level can drop.
- When the skimmer starts sucking air, stop vacuuming, and let the pool refill.
- Move the backwash hose frequently to prevent erosion and oversaturation.
- Vacuuming to Waste: Why and When
- Vacuuming the waste is helpful when there is a lot of debris in the pool, especially dirt, which clogs the filter quickly, requiring you to stop vacuuming.
Stop vacuuming to backwash or clean the filter. When one vacuums for disposal, the water never enters the filter tank, but exits through the waste port, and out through the backwash hose or pipe.
How do swimming pool solar blankets work?
A swimming pool cover is essential for pool maintenance. It keeps rain and debris out of the outdoor pool when it’s not in use and reduces evaporation, saving you money on water bills. In addition, pool covers protect children and pets from drowning. There are several types of swimming pool covers; However, a solar cover, also known as a blanket, not only covers your pool but also captures solar energy to naturally raise the pool’s water temperature. It heats the pool during the day and maintains its temperature at night. Using solar energy is the most efficient, cost-effective way to heat your pool, enabling you to save money and extend your swimming season. However, at the same time the sun heats the water in the pond, and heat is lost through other factors such as wind and evaporation. A swimming pool solar blanket helps conserve heat from the sun, reducing your heating costs. In addition to heating the water, a solar blanket helps prolong the effectiveness of pool chemicals.
A solar blanket looks like a large sheet of bubble wrap. It effectively heats the pool water by allowing more of the sun’s rays to enter the pool. While its air bubbles trap the pool’s heat at night. You should keep the cover on as much as possible between swims. Some owners install a metal rail at one end of the pool deck, making it easier to get the blanket on and off. You don’t need to attach solar blankets to the sides of the pool. It can float freely on the surface.
How Swimming Pools Work
Conceptually, swimming pools are very simple — they are just large basins of water. But on a hot summer day, a swimming pool seems like the greatest invention known to man. And as it turns out, there’s actually a lot of cool technology at work in your average pool — more than you might expect.
In this article, we’ll learn how ponds are built, and we’ll take a look at the plumbing system that keeps the water clean and chemically balanced. Swimming pools are high-maintenance additions to your home, and they especially affect your electricity bills. One way to save money and energy is to control evaporation in both indoor and outdoor pools by using pool covers.
Pool covers are the most effective way to save energy and keep your pool warm and clean. Cover your pool when it’s not in use to minimize evaporation, which is a huge energy guzzler even in indoor pools, as indicated by high indoor humidity. Most of the heat loss in swimming pools is the result of evaporation And pool covers help reduce heating costs considerably. Evaporation rates are affected by pool temperature and climatic conditions – air temperature, wind, and humidity. You also save water by reducing evaporation, and by keeping the water temperature up with a pool cover you reduce the need for electric heating sources. With less evaporation, you won’t need to add as many chemicals to your swimming pool. Pool covers keep debris out of the pool, as well, which keeps cleaning costs down.
Pool covers can be made of vinyl or polyethylene, and the material can be transparent or opaque., Vinyl covers are the most durable. The most affordable type of pool cover is a solar pool cover, also known as a bubble cover. Solar pool covers are made of thick UV-blocking plastic material, and they look like bubble wrap material. They are most effective in dry and windy climates, which increase evaporation from the pool surface. Outdoor pools in any climate absorb solar energy that hits the surface of the pool and heats the water. A transparent solar pool can have less coverage. To some extent it absorbs energy; However, especially in dry and windy climates, solar cover creates a warm and humid environment that reduces evaporation.
Pool Basics
Swimming pools come in all shapes and sizes, but almost all, from backyard personal pools to water park view pools, work in the same basic way. They use a combination of filtration and chemical treatment to continuously purify large volumes of water.
A typical swimming pool requires seven major components:
- A basin
- A motorized pump
- Water filter
- A chemical feeder
- Drains
- Returns
- PVC plastic plumbing combines all these elements.
The basic idea is to pump water in a continuous cycle, through a filtering and chemical treatment system from the pool and back to the pool. Thus, the pumping system keeps the water in the pool relatively free of dirt, debris, and bacteria. Some pools also include heaters in the mix to keep the water at a certain temperature.
Pool pH levels
The pH of water is a measure of its total acidity — the relative ratio of acids and alkalis in water (see Chem4Kids: Acids & Bases for a description of acids and alkalis). Simply put, water that is either too acidic or too alkaline will cause undesirable chemical reactions. If the water is too acidic, it will corrode metal tools, cause etching of surface materials and cause skin irritation. If the water is too alkaline, it can cause scaling on the pool surface and plumbing fixtures and make the water cloudy. Additionally, both high acidity and high alkalinity alter the effectiveness of chlorine. If the water is too alkaline, the chlorine will not destroy pathogens as well, and if the water is too acidic, it will kill them too quickly.
On the pH scale, zero indicates extreme acidity, 14 extreme alkalinities, and 7 neutral. Most pool experts recommend a pool pH between 7.2 and 7.8. To raise or lower the pH, a pool protector simply adds acid or alkali to the water. For example, adding sodium carbonate (soda ash) or sodium bicarbonate (baking soda) will generally raise the pH, and adding muriatic acid or sodium bisulfate will lower the pH. Maintaining the proper balance of chemicals in a pool is a continuous process because any new factor — oil from a swimmer’s body, a shot of chlorine, things that fall into the water — changes the total chemical composition of the water. In addition to pH, pool keepers also monitor total alkalinity, calcium hardness, and total dissolved solids.
When you consider all the chemistry and machinery involved in swimming pools, it’s clear that they are truly remarkable pieces of technology. Creating and maintaining these summer staples takes a surprising amount of work and ingenuity.